
Understanding How Revit "Sees" Element Positions#
When working with automation in Revit — whether through Dynamo or direct programming — one of the first questions that arises is: how does the software know where each element is located?
The answer involves several different strategies, and the most common one involves a concept called Bounding Box. In this article, I'll explain what this means in practice, what other methods exist to identify the location of objects within a BIM model, and how you can skip the complexity entirely with a purpose-built solution.
What is a Bounding Box?#
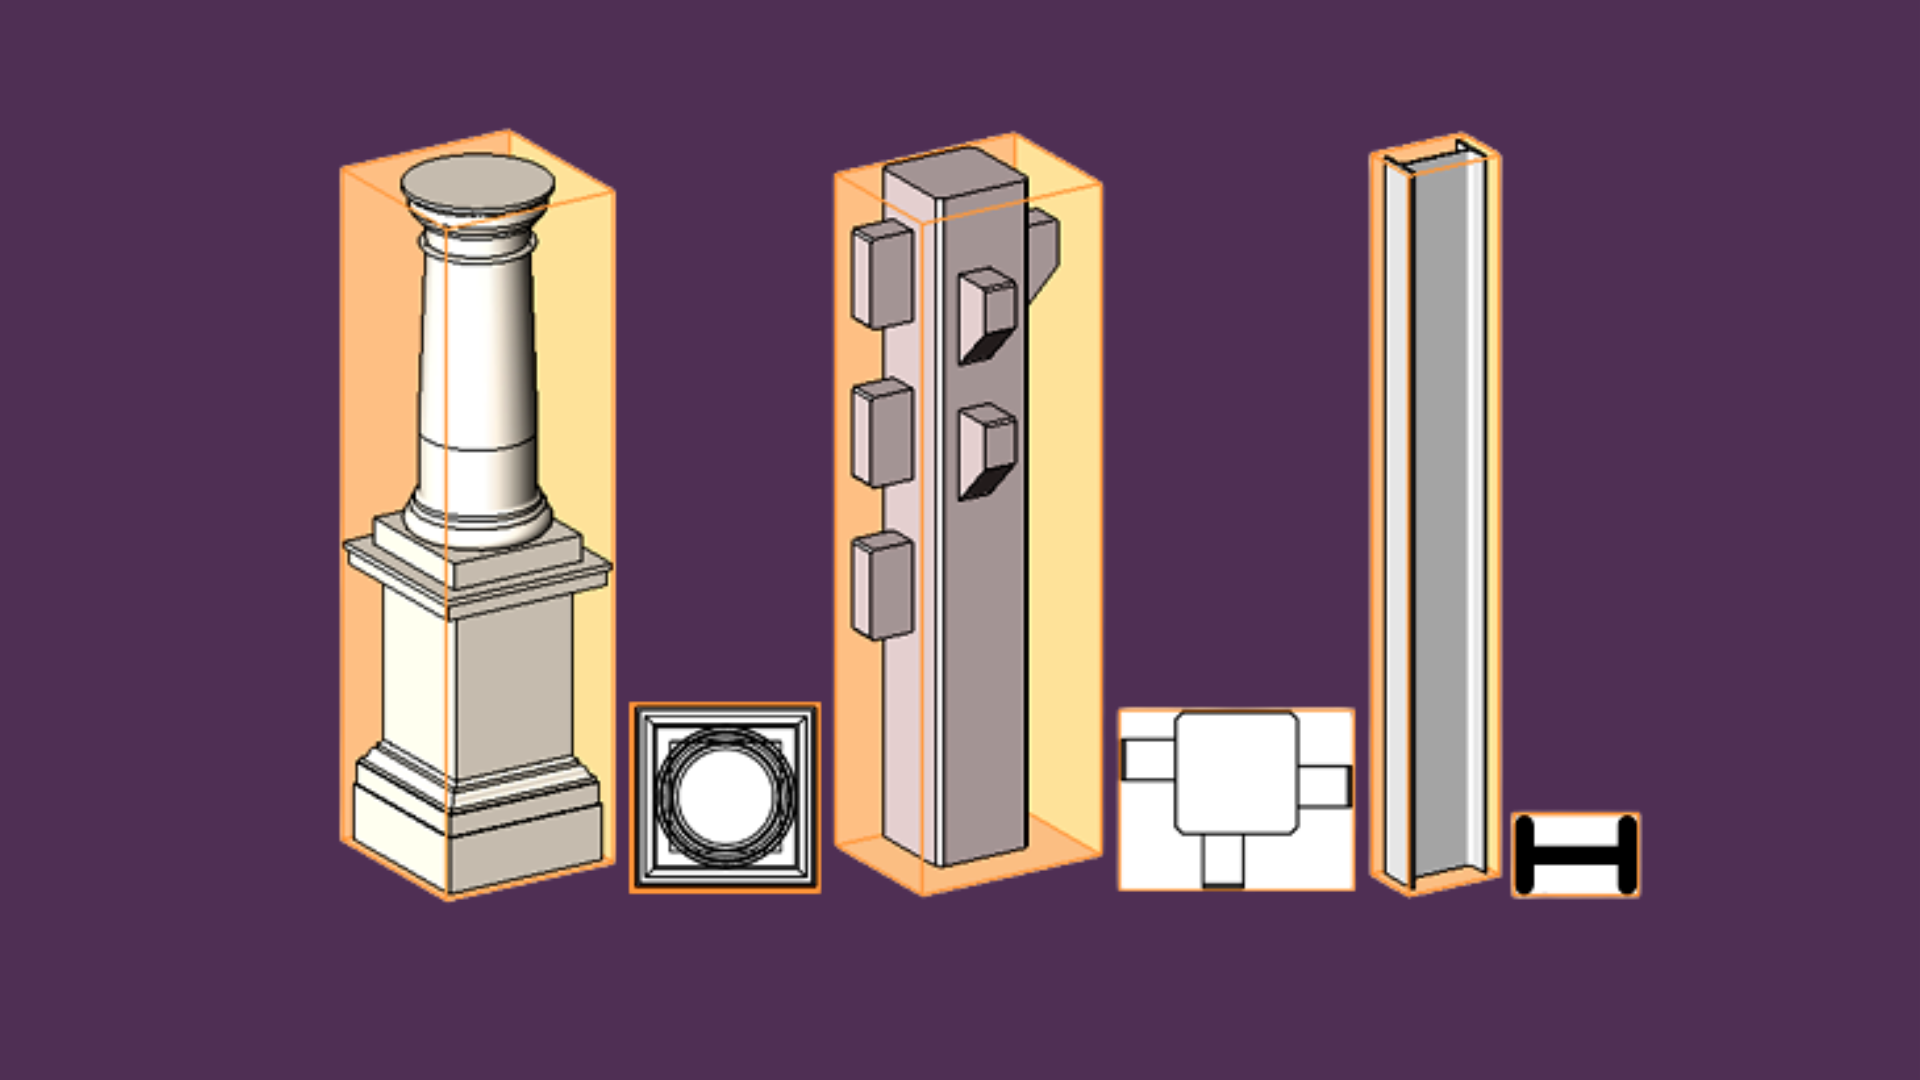
Imagine you need to wrap any object — a chair, for example — in a rectangular box. This box would be the smallest "package" capable of completely surrounding the object, with all its faces parallel to the X, Y, and Z axes of the environment.
This is a Bounding Box: an imaginary box, aligned with the model's axes, that represents the outer limits of an element.
In Revit, every modeled family — a light fixture, an outlet, mechanical equipment — has an associated Bounding Box. It's defined by two points: the lower corner (Min) and the upper corner (Max) of this virtual box.
Why is This Useful?#
Because it's an extremely fast way to answer questions like:
- Is this element inside a specific room?
- Which objects are in the area of influence of another?
- Is there overlap between two pieces?
The calculation is simple: just check if the boundaries of one box touch or are contained within the boundaries of another. There's no need to analyze the actual geometry of the object, which can be complex and time-consuming to process.
The Dynamo Approach: Powerful but Complex#
Many BIM professionals turn to Dynamo to solve spatial location challenges. And it works — but at a cost.
Building a Dynamo script for Room/Space detection requires:
- Extracting location points from each element type (understanding LocationPoint vs LocationCurve)
- Querying Rooms using
Room.IsInsideRoomor similar spatial nodes - Handling edge cases — elements outside rooms, null values, MEP above ceilings
- Writing parameters back to elements with proper transaction handling
The Real Cost of Dynamo Scripts#
This approach has significant drawbacks:
- Learning curve: Weeks or months to become proficient
- Maintenance burden: Scripts break with Revit updates and model changes
- Edge case handling: Each new model reveals new failure modes
- No support: When it breaks at 2 AM before a deadline, you're on your own
- Performance issues: Naive implementations can freeze on large models
- Inconsistent results: Different team members create different scripts
The Technical Foundation: Multiple Detection Strategies#
To build a robust solution, you need to understand and implement multiple detection strategies:
Location Point and Location Curve#
Many elements have a defined insertion point — it's the place where you "clicked" to position it in the model. Face-based families, equipment, furniture, and electrical devices generally have a Location Point.
Linear elements like ducts, pipes, and cables have a Location Curve: a line that represents their path.
Point Inside Room Check#
Revit offers a native method to check if a point is inside a Room or Space. It's fast and precise, but only works for elements that have a defined location point.
Host Element Strategy#
Some elements (like electrical fixtures) are hosted on walls, ceilings, or floors. You can inherit the Room/Space from the host element — but implementing this requires understanding Revit's element relationships.
Solid Geometry Intersection#
When precision is critical, you can resort to solid geometry analysis. It's the most precise method available, but also the most computationally expensive.
Comparing the Strategies#
| Method | Speed | Precision | Implementation Complexity |
|---|---|---|---|
| Bounding Box | High | Low | Medium |
| Location Point | High | Medium | Medium |
| Host Element | High | High | High |
| Point in Room/Space | High | High | Medium |
| Solid Intersection | Low | High | Very High |
The best solutions combine multiple approaches in a cascade pattern: try fast methods first, then fall back to more precise (but slower) methods when needed.
The Better Alternative: UNIBIM Smart Location#
What if you could skip all this complexity?
UNIBIM Smart Location is a purpose-built feature that handles everything automatically:
What It Does#
- Automatic Room/Space Detection: Detects which Room or Space each element belongs to
- Multi-Strategy Engine: Uses 5 different detection strategies in cascade (Host Element → Spatial Index → Direct Property → API Query → Geometric Fallback)
- Directional Delta Expansion: Handles elements above ceilings or below floors with configurable detection boundaries
- Batch Processing: Processes 500-1000+ elements per second with optimized spatial indexing
- One-Click Write: Writes results to standard Revit parameters or custom shared parameters
Why Choose a Dedicated Plugin?#
| Aspect | Dynamo Script | UNIBIM Smart Location |
|---|---|---|
| Setup Time | Days to weeks | 5 minutes |
| Learning Curve | Steep | None |
| Maintenance | You | Professional updates |
| Edge Cases | Trial and error | Battle-tested |
| Performance | Variable | Optimized (500+ elem/sec) |
| Support | None | Professional support |
| Revit Updates | Scripts may break | Tested compatibility |
The ROI Calculation#
Consider the real cost of the Dynamo approach:
- Learning time: 40+ hours to become proficient
- Script development: 20+ hours for a robust solution
- Maintenance: 5+ hours per year fixing issues
- Debugging: Unknown hours when it fails during a deadline
At a professional rate of $50-100/hour, that's $3,000-6,000 or more in hidden costs — plus the stress and risk of unreliable automation.
See It In Action#
Let's walk through the Smart Location workflow step by step:
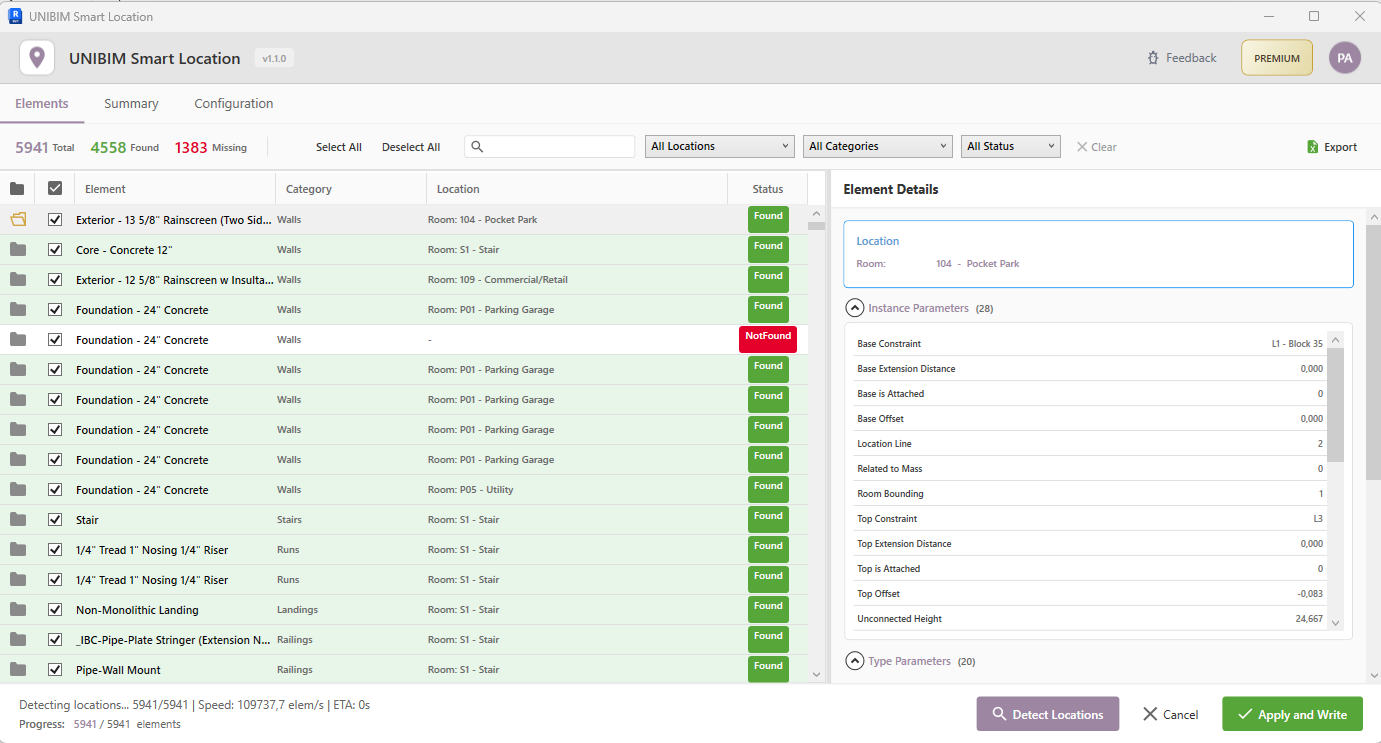
Step 1: Select Elements, View the List, and Detect Locations#
After selecting elements in Revit, the Elements tab displays all items. Click "Detect Locations" and watch the plugin automatically find the Room/Space for each element with status indicators.
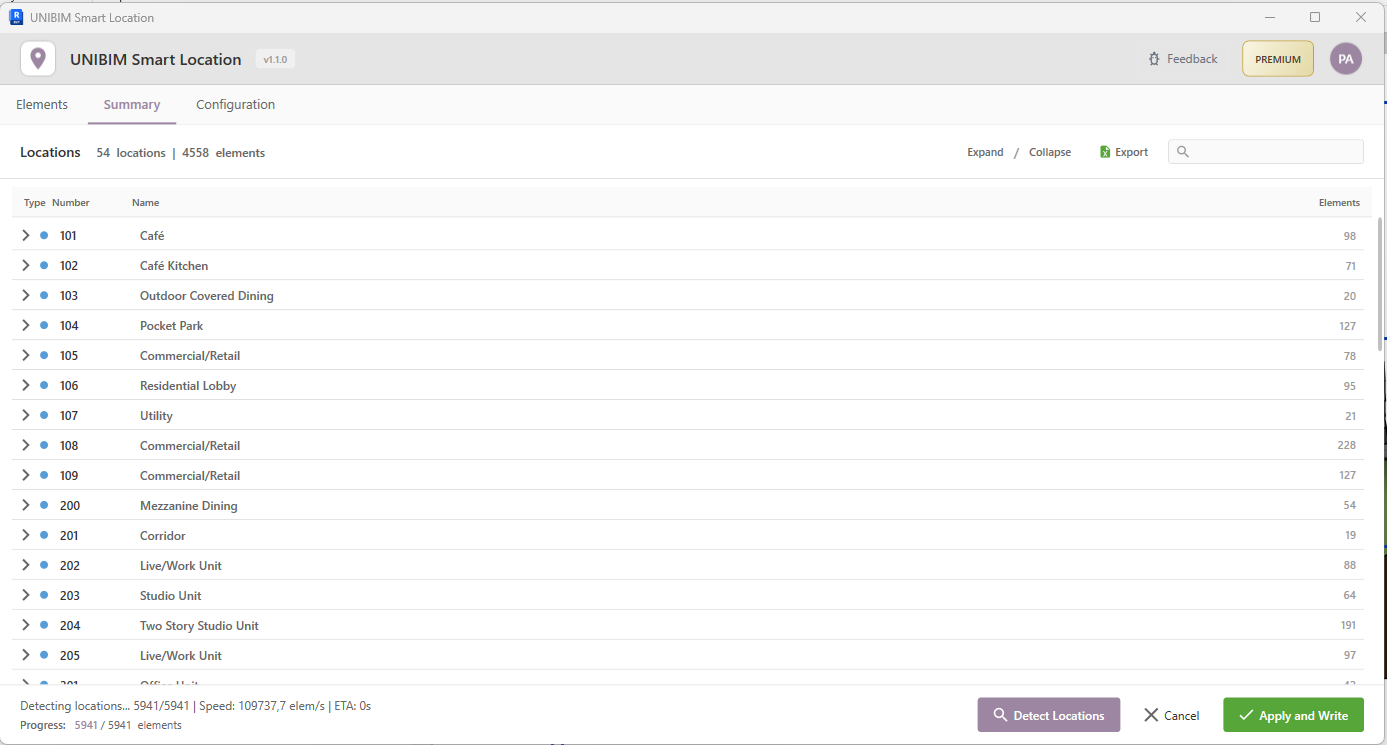
Step 2: Review Summary by Space/Room#
The Summary tab groups elements by their detected location, making it easy to verify results and identify patterns across your model. You can also export the summary to Excel for documentation or further analysis.
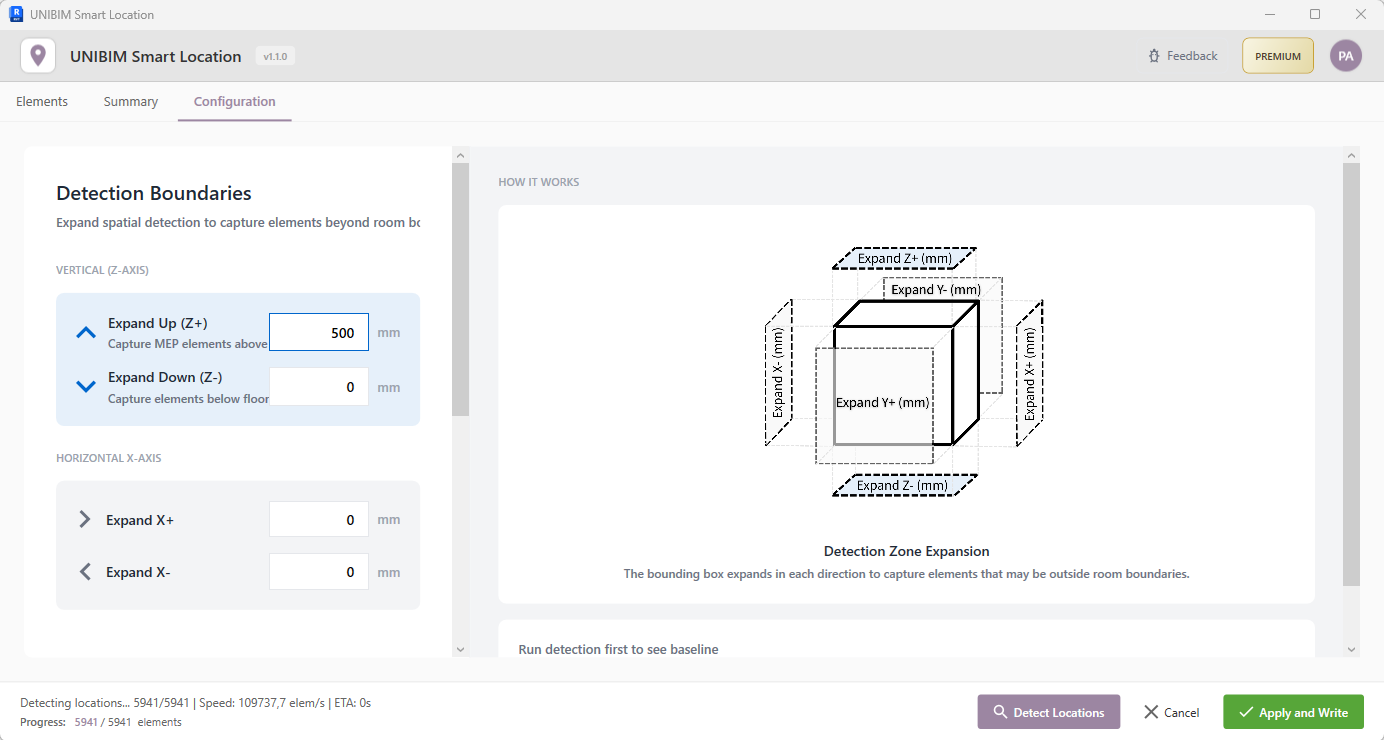
Step 3: Configure Detection Boundaries (Premium)#
The Configuration tab allows fine-tuning detection boundaries — perfect for MEP elements above ceilings or below floors.
Step 4: Write Locations to Each Element#
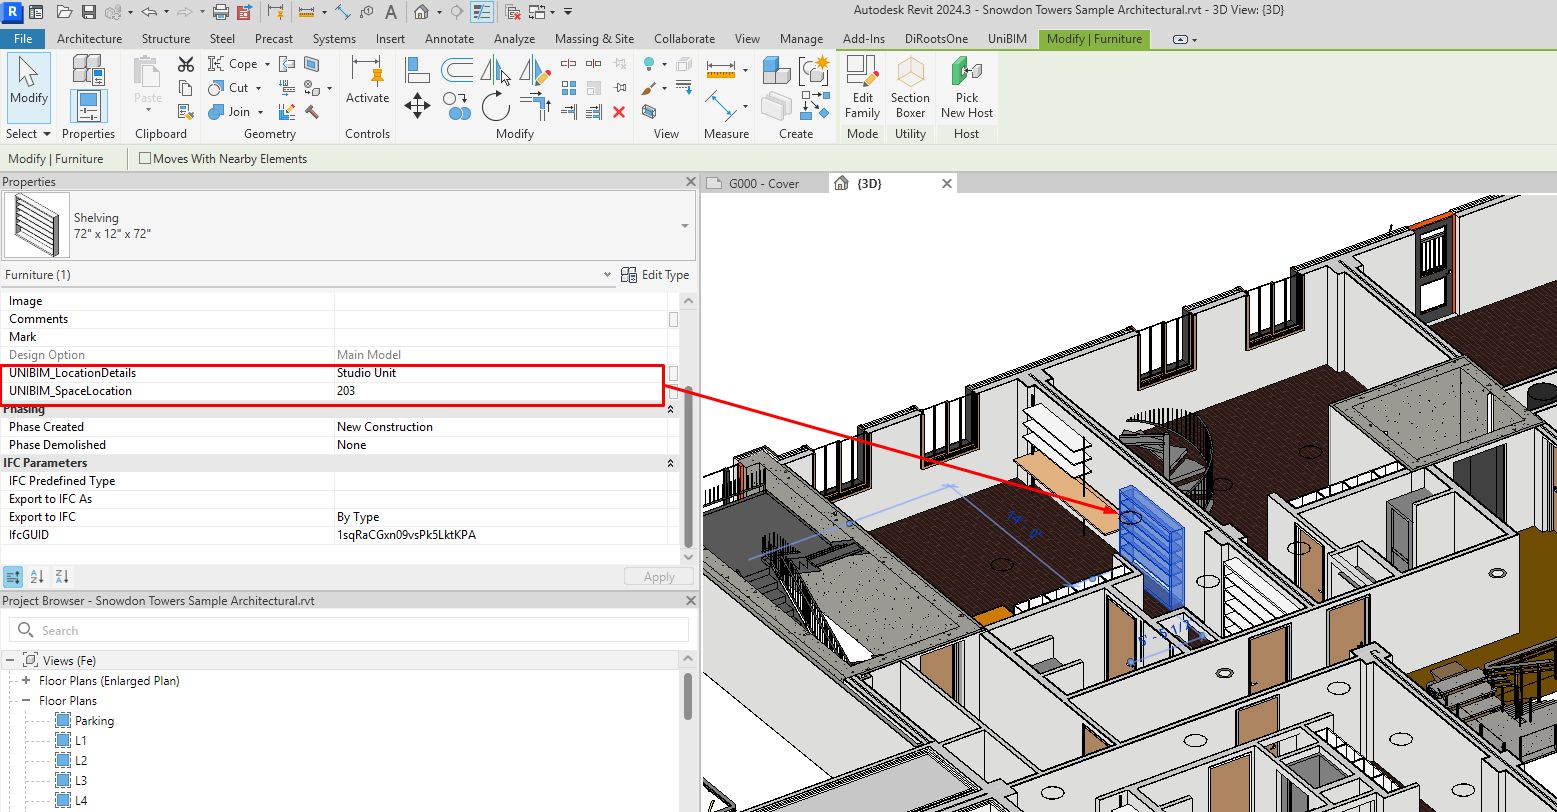
Click "Write Parameters" and the detected locations are written directly to each element. Here you can see a cabinet with the UNIBIM location parameter filled with the Room name.
The Complete Workflow#
Here's the entire process in action — from selection to parameter writing:
What you're seeing:
- Select elements in Revit (MEP equipment, furniture, electrical devices, etc.)
- Click "Detect Locations" — the plugin automatically finds Room/Space for each element
- Review results in the interactive table with filtering and sorting
- Click "Write Parameters" — the detected values are written back to Revit
No scripting. No maintenance. No edge case debugging. Just results.
Get Started Today#
UNIBIM is available as a free download with core features, and Premium tier for advanced capabilities like directional delta expansion and priority support.
Final Considerations#
The Bounding Box and related spatial detection techniques are fundamental concepts for anyone working with BIM automation. Understanding them helps you appreciate the complexity that goes into reliable spatial analysis.
But understanding concepts and building production-ready tools are very different things.
For professionals who need to get work done — not spend weeks becoming Dynamo experts — a purpose-built plugin provides:
- Immediate productivity instead of a learning curve
- Reliable results instead of debugging sessions
- Professional support instead of Stack Overflow searches
- Continuous updates instead of maintenance burden
The choice is yours: invest weeks in scripting, or invest minutes in a solution that just works.
Questions or Feedback?
I'd love to hear your thoughts on this article. Reach out directly and let's start a conversation.
Follow me on LinkedIn for more BIM tips and updates