
Introduction to Beautify#
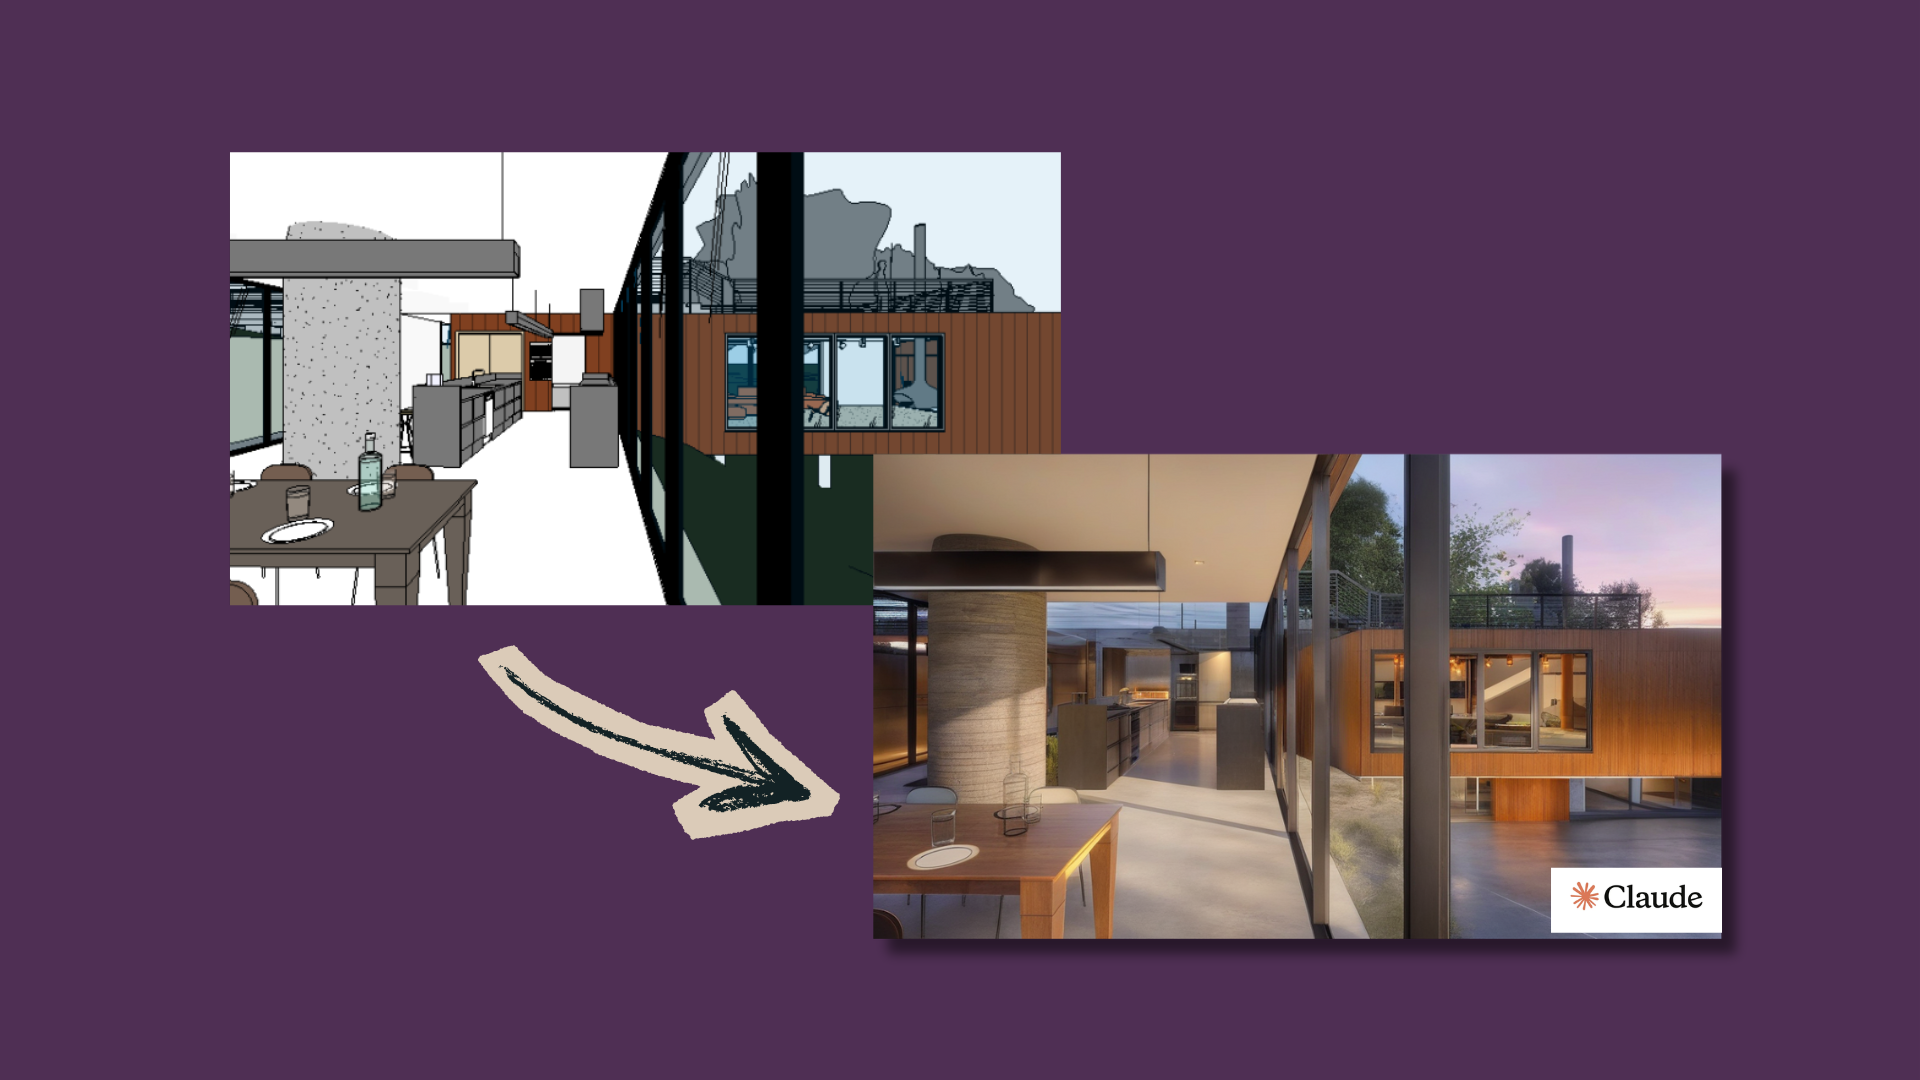
Beautify represents a new era in BIM project visualization. It's not just about "taking screenshots" from Revit and applying filters — Beautify uses advanced artificial intelligence that understands your model, analyzing geometries, materials, building systems, and spatial context before transforming the image.
This intelligent approach opens doors to a future where AI doesn't just render, but actively collaborates with BIM professionals, understanding project intent and suggesting the best ways to communicate it visually.
Whether you need a quick sketch-style presentation, a professional clay model visualization, or a dramatic blueprint effect, Beautify offers over 20 predefined styles designed specifically for BIM professionals.
Why is Beautify different?#
Most "beautification" tools simply apply generic filters. Beautify goes further:
- Understands context: The AI analyzes whether it's an MEP, architecture, interiors, or landscape project
- Preserves technical integrity: Geometries and proportions are maintained with precision
- Adapts to content: Parameters are automatically optimized for each element type
- Learns from your project: The system identifies specific elements (ducts, walls, furniture) to apply appropriate styles
How Beautify Works#
The Beautify workflow combines simplicity in the interface with intelligence behind the scenes:
1. Intelligent View Capture#
When you click the Beautify button, UNIBIM automatically captures the current Revit view in high resolution. But the magic is in what happens next: the AI doesn't just see pixels — it interprets your project.
The tool supports multiple view types:
- Floor Plans - Transform technical drawings into artistic representations
- Elevations - Create stunning facade visualizations
- Sections - Generate expressive sectional drawings
- 3D Views - Produce stylized or technical renders
- Details - Enhance construction details with artistic flair
- Renderings - Improve existing renders with AI enhancement
2. Contextual AI Analysis#
Beautify's differentiator is its ability to understand what's in the image before transforming it:
- Identifies architectural elements: Walls, floors, roofs, MEP systems
- Recognizes project type: Automatically distinguishes between architecture, installations, interiors
- Analyzes composition: Understands perspective, focal points, and visual hierarchy
- Generates specific instructions: Creates a personalized "briefing" for image generation
This intelligent analysis is what enables results that make sense for your specific project type.
3. Adaptive Generation#
Based on the analysis and selected style, the system generates the final image ensuring:
- Preserved geometry: Original proportions and shapes are maintained
- Contextual interpretation: Styles are applied intelligently by element type
- Technical precision: Where needed, technical clarity is prioritized
Available Styles#
Beautify offers three categories of styles, each optimized for different use cases:
Rendering Styles#
These styles enhance visual quality while preserving technical accuracy:
| Style | Description | Best For |
|---|---|---|
| MEP Technical | Professional MEP with Inventor-style gradient background | MEP coordination, duct/pipe presentations |
| Ambient Occlusion | White model with soft contact shadows | Depth visualization, design review |
| Matte White | Clean white model photography aesthetic | Minimalist presentations |
| Clay Model | Physical architectural maquette look | Concept presentations |
| Concrete | Raw concrete/brutalist material | Brutalist architecture |
| Metallic | Brushed metal/steel industrial finish | Industrial designs |
| Glass | Transparent glass with subtle reflections | Facade studies |
| Wood | Natural wood grain texture | Interior presentations |
| Brick | Exposed brick texture | Traditional architecture |
| Marble | Polished marble with veining | Luxury interiors |
| Copper | Patinated copper/bronze finish | Historic or artistic presentations |
Technical Styles#
Optimized for documentation and technical presentations:
| Style | Description | Best For |
|---|---|---|
| Technical | Enhanced clarity for documentation | Client presentations |
| Blueprint | Classic blue technical drawing | Historical aesthetic |
| Line Art | Clean architectural line drawing | Publication-ready drawings |
| Isometric | Optimized for axonometric views | Diagram presentations |
| Wireframe | Technical wireframe visualization | Structure analysis |
| Thermal | Heat map thermal visualization | Energy analysis presentations |
Artistic Styles#
Creative visualizations for presentations and marketing:
| Style | Description | Best For |
|---|---|---|
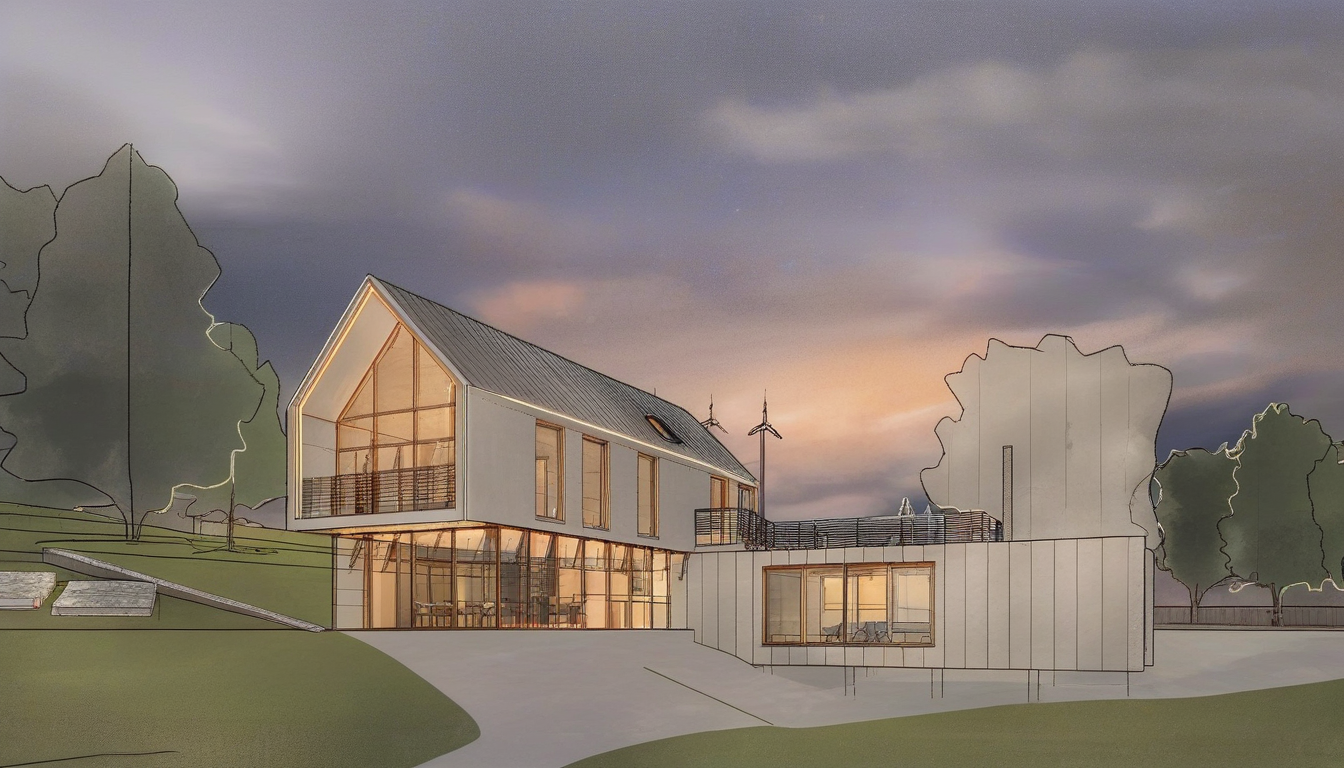
| Sketch | Hand-drawn architectural sketch | Early-stage presentations |
| Shadows | Black and white shadow study | Dramatic effect |
| Watercolour | Watercolor texture with original colors | Artistic presentations |
| Ink Wash | East Asian ink painting style (Sumi-e) | Cultural projects |
| Charcoal | Rich charcoal architectural drawing | Atmospheric presentations |
| Sepia | Vintage sepia tone aesthetic | Historical projects |
| Neon | Glowing outlines on dark background | Modern/tech presentations |
| Noir | Film noir dramatic black and white | High contrast effect |
| Pastel | Soft pastel color palette | Gentle presentations |
Using Beautify Step-by-Step#
Step 1: Open Your View#
Navigate to any supported view type in Revit. For best results:
- Ensure the view is properly cropped to focus on the subject
- Adjust visual styles and detail levels as needed
- Remove unnecessary elements that might clutter the result
Step 2: Click the Beautify Button#
Find the Beautify button in the UNIBIM ribbon panel (Coordination tab). The tool will:
- Capture the current view
- Open the Beautify window with a preview
Step 3: Select Your Style#
Browse through the available styles and click one to select it. The panel shows:
- Style name and category
- Brief description of the effect
- Recommended use case
Step 4: Choose Project Type#
Select the project type that best matches your content:
- Architecture - Buildings, facades, exteriors (uses Scribble/HED ControlNet)
- MEP - Ducts, pipes, equipment (uses Canny ControlNet for precise lines)
- Interior - Furniture, finishes, interior spaces
- Landscape - Exterior, vegetation, site plans
This selection optimizes the AI model for your specific content.
Step 5: Adjust Parameters (Optional)#
For fine-tuned control, advanced users can adjust:
- Strength (0.1–0.5): How much the image should change from the original
- Condition Scale (0.7–1.0): How closely to follow the original geometry
- Guidance Scale (3.0–9.0): How strongly to follow the style prompt
Lower strength values preserve more of the original; higher values create more dramatic transformations.
Step 6: Generate and Save#
Click "Generate" to start the AI processing. After 15-60 seconds, you'll see:
- The original image on the left
- The beautified result on the right
- Compare slider to evaluate the transformation
Save options include:
- Save to Project Folder: Saves alongside your Revit file
- Save As...: Choose custom location and format
- Copy to Clipboard: Quick paste into presentations
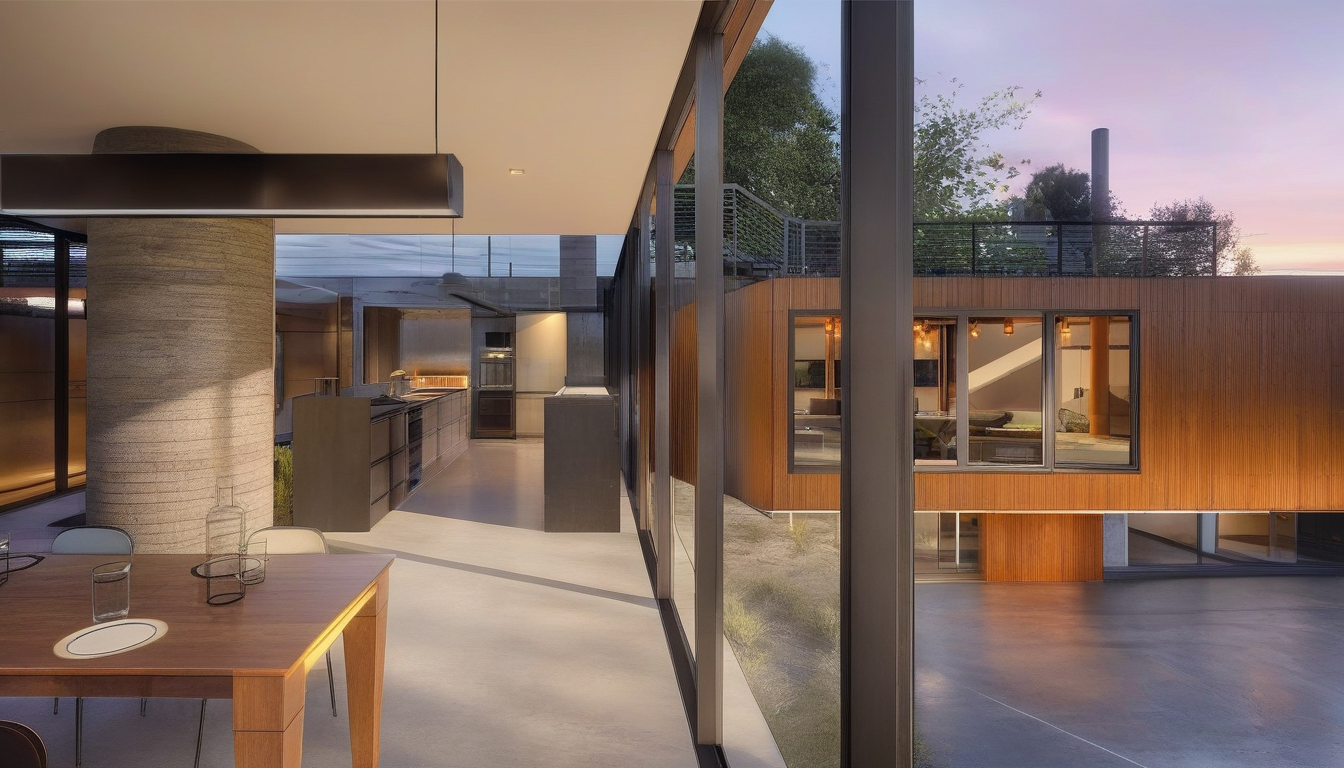
Example Results#
Check out some examples of Revit views transformed by Beautify:
Filter: Night Scene#
Exterior yard view — Night Scene Filter
Kitchen — Night Scene Filter
Filter: Watercolor#

Living Room — Watercolor Filter
Beautify Interface#
Beautify interface showing the style selection and image generation flow.
Free vs Premium Features#
Free Tier#
- Access to all predefined styles
- Standard resolution output (1024px)
- 5 beautifications per day
- Before/After comparison
Premium (PRO Plan)#
- Custom prompts for unlimited creativity
- High-resolution output (up to 2048px)
- Unlimited beautifications
- Priority processing queue
- Style history and favorites
Best Practices#
For Architecture#
- Use 3D views for the most dramatic transformations
- Clay Model and Matte White work excellently for concept presentations
- Enable shadows in Revit before capturing for better depth perception
For MEP#
- MEP Technical style was designed specifically for mechanical, electrical, and plumbing
- The Inventor-style gradient background improves visual hierarchy
- Works best with isometric or 3D views
For Presentations#
- Sketch and Watercolour create approachable, less technical visuals
- Blueprint adds a classic engineering aesthetic
- Combine with Technical style for documentation that stands out
For Marketing#
- Neon and Noir create eye-catching visuals for social media
- Ambient Occlusion produces clean, professional hero images
- Use high-resolution export for print materials
Technical Requirements#
- Revit Versions: 2022, 2023, 2024, 2025
- Internet Connection: Required (AI processing happens in the cloud)
- Authentication: Must be logged into UNIBIM
- View Types: Floor Plan, Ceiling Plan, Elevation, Section, 3D, Detail, Drafting, Rendering
Troubleshooting#
"View type not supported"#
Switch to a supported view type (3D, plan, elevation, section, or detail).
Slow processing#
AI image generation typically takes 15-60 seconds depending on server load. Premium users get priority processing.
Result doesn't match expectations#
Try adjusting:
- Lower the Strength to preserve more original detail
- Increase Condition Scale to follow geometry more closely
- Select a different Project Type that better matches your content
Authentication required#
Ensure you're logged into UNIBIM. The Beautify feature requires authentication for usage tracking and fair access.
Conclusion#
Beautify transforms the way BIM professionals create visualizations. Instead of spending hours in external rendering software or hiring visualization specialists, you can now generate stunning images directly from Revit in seconds.
But Beautify goes far beyond "taking pretty screenshots."
By integrating artificial intelligence that understands BIM models, we're building the foundation for a new form of interaction between professionals and technology. Beautify is just the first step in a journey where:
- AI understands your project, not just pixels
- Visualizations are generated contextually, adapting to element type
- Visual communication becomes instant, with no learning curve
This approach opens doors for future improvements: automatic coordination analysis, visual optimization suggestions, and much more. Beautify is not a filter tool — it's an intelligent visual communication platform.
The combination of predefined styles for quick results and adjustable parameters for fine control makes Beautify an essential tool for:
- Architects presenting concepts to clients
- Engineers documenting technical systems clearly
- BIM Coordinators creating engaging coordination reports
- Project Managers communicating design intent to stakeholders
Ready to try Beautify? Download UNIBIM and start transforming your Revit views today!
Questions or Feedback?
I'd love to hear your thoughts on this article. Reach out directly and let's start a conversation.
Follow me on LinkedIn for more BIM tips and updates